Essential Guidelines for a Successful Shower Screen Installation
Undoubtedly, the role of a shower screen in a bathroom is pivotal. Beyond preserving a dry and clean bathroom floor, it significantly influences both the bathroom’s functionality and aesthetics. Whether you’re opting for a frameless shower screen, semi-frameless design, or over bath shower screen, thorough preparation is vital for both professional installers and buyers.
In this comprehensive article, we’re pleased to present crucial tips and indispensable tools for a seamless shower screen installation. This guide is invaluable for customers who have purchased or intend to install a shower enclosure. Utilize these insights to avert unnecessary errors and setbacks.
In this comprehensive article, we’re pleased to present crucial tips and indispensable tools for a seamless shower screen installation. This guide is invaluable for customers who have purchased or intend to install a shower enclosure. Utilize these insights to avert unnecessary errors and setbacks.
Thorough Inspection
Upon receiving the product, it’s imperative to conduct a thorough inspection within 3 business days. Confirm the product’s pristine condition, absence of finishing defects, and presence of all components. Should any damage, defects, or missing parts be identified, promptly contact us for replacements. Note that the supplier won’t replace damaged items or missing parts free of charge after 3 business days or post-installation.
Assess Product Condition
After unboxing and reviewing the instruction manual, meticulously inspect all packages for potential shipping damage. Cross-reference the piece count with the packing slip. Validate the inclusion of all necessary parts by comparing them against the “Detailed Diagram of Shower Enclosure Components.”
Surface and Plumbing Readiness
- Prioritize the protection of your shower base by covering it with a protective cloth throughout the installation
- Guarantee a level and robust installation surface capable of supporting the unit’s total weight.
- Ensure the walls are plumb, as irregularities can result in significant installation challenges.
- While certain units offer leveling adjustments, a well-prepared surface is crucial. Surface irregularities can necessitate adjustments and drilling. Safeguard all primary surfaces during the installation process.
- For some units, the shower door’s orientation is reversible for left or right-hand door installation. The installation manual showcases the right-hand door installation. For left-hand door installation, commence on the opposite wall and reverse the steps’ orientation.
Essential Tools
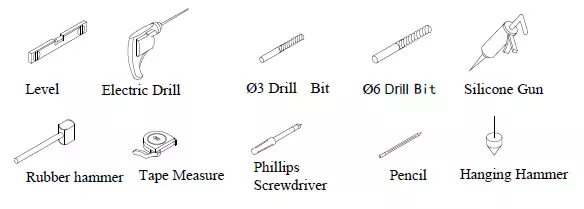
Gathering the necessary tools beforehand is essential for a smooth installation process. Common tools required include measuring tape, level, drill, screwdriver, masking tape, and protective gloves.